NDE Associates, Inc. – Phased Array for Weld Inspection
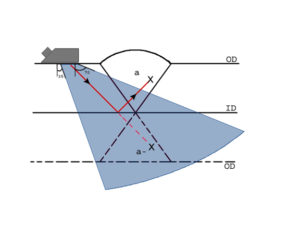
The concept of weld inspection is shown below. A probe is selected that illuminates the weld as shown below. In the first leg, only the bottom half of the weld is illuminated. However, with reflection from the ID surface the entire weld is illuminated and the complete weld volume can be inspected. For example, the indication ‘a’ in the weld is detected by the reflected sound and displayed as the mirror image ‘a-’ in the second leg. Similarly other flaws are displayed in the image.

Concept of phased arrays for Weld Inspection. Indication ‘a’ detected by the reflected beam is displayed as a mirror image ‘a-‘ in second leg

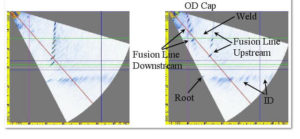
PAUT of weld showing inter-bead lack of fusion
PHASED ARRAY vs. CONVENTIONAL ANGLE BEAM UT
1. Conventional angle beam UT produces a single A-scan at a specific angle. UT evaluation requires plotting the indication using the refracted angle, metal path and surface distance. PAUT displays images in real time showing the depth and location of indication relative to the probe.
2. Coventional angle beam UT is limited to a single refracted angle. PAUT simultaneously takes data from a range of angles, eg 40 to 75 degrees and reconstructs an image in real time
3. PAUT image is easy to comprehend as it gives a display of the ultrasound superimposed on the test piece
4. PAUT is more reliable inspection than conventional angle beam UT
